In preparation for my racing in 2011, the car needs to be altered - or 'upgraded' - to meet the requirements of Roadsport-B.
These upgrades are designed to make the car faster - mainly in the corners.
I don't have a blow-by-low account of the changes and how I went about fitting them but as a list...
- The engine needed modifications to strengthen the valves and belt pulley. This is as a result of stickier tyres being fitted (they don't lock as easily so put more strain through the powertrain). There is no change to the power output of the car.
- The stickier tyres are a change to more track-focused Avon CR500 tyres. The wheels stay the same, though.
- A Rear Anti-roll Bar results in less roll at the back of the car. It is adjustable to alter the characteristics and grip to suit the conditions.
- A short undertray is required at the front of the car to protect the engine. This is because the car sits a little lower on the new tyres and there is a greater risk of debris lifting into the engine bay.
- Again, as a result of the tyres, there is an Oil Catch Tank system. As the car is wet-sumped (oil sloshing around in the sump of the engine), it risks going into the breather system in high-speed corners. This oil would be burnt but it isn't good for the engine.
- A new cap is needed for the brake master cylinder. I already had this part fitted last year. It's there to stop brake fluid leaking (another symptom of sticky tyres).
The changes make a massive difference to the way the car handles and I love it!
Friday 1 April 2011
Monday 10 May 2010
As good as done...
Nothing to add from the build of the car so all future enties will be on my race blog - there's a link on the right hand side...
See you there and thanks for reading!
Joel
See you there and thanks for reading!
Joel
Thursday 15 April 2010
A recall - Caterham style!
While the news is full of Toyota recall details, Caterham quietly had one of their own - but they did it with a bit more interaction. In fact, a pack of bolts fell through the door via Postman Pat with instuctions to re-fit the rear hub mounting bolts. While I was doing the side impact bar, I took the hub to pieces and replaced the bolts according to the instructions supplied by Caterham. It's an easy job and completed within the hour...
Side protection
An extension of the roll cage is the side impact protection bar. It runs over the rear wing by the driver and attaches to the rear mounting point of the roll cage, the front point (at the saddle bracket) and also the the a-frame mount behind the rear wheel...
At the first attempt to get it fitted, I noticed the a-frame bolt was too short. It seems there's a specific fixing pack for the side impact bar. A quick call to Caterham and the next day I received a pack of bolts to do the necessary. Once you get the right bolts, it's a doddle but note that the front mount needs to use tyhe existing bolt as the one supplied in the pack is too long (it meets the inner bolt and doesn't tighten otherwise).
At the first attempt to get it fitted, I noticed the a-frame bolt was too short. It seems there's a specific fixing pack for the side impact bar. A quick call to Caterham and the next day I received a pack of bolts to do the necessary. Once you get the right bolts, it's a doddle but note that the front mount needs to use tyhe existing bolt as the one supplied in the pack is too long (it meets the inner bolt and doesn't tighten otherwise).
Seat Sat
A bit of a catch up on status...
My seat has been rescued by Vaughan at Real Essential. He invited me to Rockingham during a Caterham Motorsport event to personally fit a replacement seat. He was really helpful, informative and generous with his time. I can't recommend him and Real Essential enough.
A few points about the seat - it's very labour intensive and while getting a fitting done is expensive, the results are outstanding. I've been out a few times in the car since getting the seat fitted and you feel 'at-one' with the car. Every movement is transmitted through you so the amount of feel available is excellent.
In fact, it's so well fitted, it requires a great deal of wriggling technique to get in and out - I'm really pleased I got a removeable steering wheel...
Tuesday 23 February 2010
Are you sitting comfortably?
My Dad finally got to help me today and I know he's been itching to get involved. Firstly, I put the extinguisher back in but the real reason for getting to work on the car today was fit a new seat.
In order to satisfy the regulations which dictate my helmet should be 50mm lower than the top of the roll-cage, I need to fit a special seat. The composite Tillet seat I originally fitted made me sit too high. Even if it had been OK, the HANS device I now have isn't recommended with the Tillet.
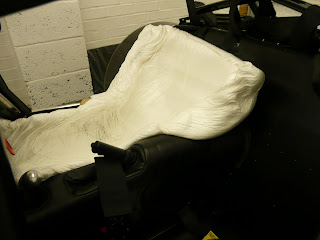
Therefore, I had a choice of a foam seat or a resin-bead seat. Ultimately, they do the same job: they mould to the shape of the driver. The foam is cheaper but is less reliable - and you get one go at getting it right. Therefore, and with significant help from my parents, I went for the resin-bead seat. This is basically a bean-bag that you pour a resin into. The bean-bag is attached to a vacuum and when you remove the air from the bag, you can move the polystyrene 'beans' or 'beads' around to form a shape. When you're happy, you add the resin, re-form to the shape you want and wait for the resin to harden - about an hour after you apply the resin.
That's the theory...
The bag looks like this when you're trying to get the shape...


In order to satisfy the regulations which dictate my helmet should be 50mm lower than the top of the roll-cage, I need to fit a special seat. The composite Tillet seat I originally fitted made me sit too high. Even if it had been OK, the HANS device I now have isn't recommended with the Tillet.
Therefore, I had a choice of a foam seat or a resin-bead seat. Ultimately, they do the same job: they mould to the shape of the driver. The foam is cheaper but is less reliable - and you get one go at getting it right. Therefore, and with significant help from my parents, I went for the resin-bead seat. This is basically a bean-bag that you pour a resin into. The bean-bag is attached to a vacuum and when you remove the air from the bag, you can move the polystyrene 'beans' or 'beads' around to form a shape. When you're happy, you add the resin, re-form to the shape you want and wait for the resin to harden - about an hour after you apply the resin.
That's the theory...
The bag looks like this when you're trying to get the shape...


We got this far OK but when pouring the resin in, the valve came clean away from the bag. Once the air paled from it's blue hue, we had to press on because the resin needed to be worked into the beads. The valve taped, we got the now resin-charged bag into the car. Sadly, because the valve had come off, the vacuum necessary to shape the seat was impossible to keep - and the shape couldn't be held. An added problem was that the garage was really cold - and it should be room temperature for the resin to harden. After getting more frustrated with not getting the best shape, we were forced to give up...
The next day, I found the seat had hardened and I squeezed myself into the car. Surprisingly, the shape was pretty good but far from perfect - additionally, the surface was in poor condition as the bag couldn't be stretched over the beads properly (another function of the vacuum).
Wind the clock on 24 hours and having contacted the manufacturer (http://www.realessential.co.uk/) about the problem we had and they have generously offered to replace my seat. Further to this, they'll help me fit the new one when they visit Rockingham soon (and it's only down the road from me!). Despite the set-back, Vaughan at Real Essential has been very helpful and I look forward to getting this fixed.
As a footnote, I really enjoyed working on the car with my Dad and despite my foul mood, I really hope he enjoyed it too. Thanks to my Mum for keeping us full of tea. Love to you both.xxx
Tuesday 2 February 2010
Picture of the (mostly) complete car
Here is a picture of the car - just waiting for a new seat before dismantling the rear suspension to remove the roll-cage and take the car to Arch for the chassis to be altered. This is so the seatbelt mounts can be moved to allow for the HANS device I got recently.
Anyway - on to the picture...

Anyway - on to the picture...

Subscribe to:
Posts (Atom)